Creating tasks
Tutorial : How to create a new task
Section titled “Tutorial : How to create a new task”Creating a new task is quite simple, we need to create and export an instance of a class that inherits the JobConsumer class and implement the run function.
With the help of the exported types, your favorite IDE will provide all the types safety needed to start this without guessing variables or method signatures.
a minimal example provided with the scheduler backend codebase can also be a starting point : testJob
The configuration before creating the task
Section titled “The configuration before creating the task”Before starting the task implementation, you should be sure that your backend is setup correctly to find and load your tasks.
- make sure that your jobs volume is set correctly in your
compose.ymlconfiguration, be sure that you are mirroring your entire project to keep local references working - be sure to set your
.envvariableJOBS_SUB_DIRECTORYto the point to the correct folder where your task files will be inside your own folder structure structure
Creating the task file
Section titled “Creating the task file”The task is a typescript/javascript file that extends the class JobConsumer based on the exported types.
let’s create a new task that will periodically get our IP address and information from the public API of ipify.org;
import { JobConsumer } from "@jobConsumer/jobConsumer";import { JobDTO, JobLogDTO, JobOptions } from "@typesDef/models/job";
class IPEchoJob extends JobConsumer {  constructor() {    super();  }
  async run(job: JobDTO, jobLog: JobLogDTO) {    this.logEvent("Will be getting my IP address");    const response = await this.axios.get("https://api.ipify.org?format=json");    this.logEvent("Got my IP address");    this.logEvent(response.data);    await this.exportResultsToFile({      job_log_id: jobLog.id,      fileName: `ip_${new Date().getTime()}`,      results: { test: "test" },    });    this.notification.sendJobFinishNotification(      job.id!.toString(),      job.name,      "test results",    );    const successMessage = `My IP address is ${response.data.ip} at ${new Date().toString()}`;    this.logEvent("IP fetch task finished");    return this.complete(jobLog, successMessage);  }}
export default new IPEchoJob();
In the task above we are, in order :
- logging the start of the task execution
- using the embedded
axiosinstance to make an http call to the ipfy.org API - logging the result in object format
- exporting the results to a file
- logging the end of the task execution
- calling and returning the
completemethod results with a custom success message
The console logs when running this task will look like this :
[11:50:06.161] INFO: no proxy to inject found[11:50:06.167] INFO: using 0 notification services[11:50:06.168] INFO: Will be getting my IP address[11:50:06.606] INFO: Got my IP address[11:50:06.608] INFO: { "ip": "129.122.200.15"}[11:50:06.612] INFO: IP fetch task finishedYou can see the matching logs that we manually sent and some sent internally by the system like the notification services and proxies logs.
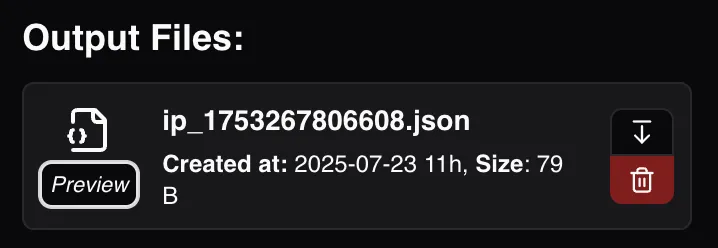
When checking the UI outputFiles drawer we can see the new output file that was created with the IP data :
The “notification.sendJobFinishNotification” call
Section titled “The “notification.sendJobFinishNotification” call”This call will be executed only if you have Gotify notification service configured in your .env. if your service is not configured,
you will see this log on console (if enabled)
[12:12:02.745] ERROR: Gotify Is not configured to usehow to add the task file to the scheduler
Section titled “how to add the task file to the scheduler”The tasks need to be registered by sending an API request to the backend server or by using the UI. the task creation body must have :
name(UNIQUE): the service name, ,cronSetting: the cron expression to run the task,param(optional): a JSON string that is used to handle various task params,consumer: The relative path to your consumer file, this must include theJOBS_SUB_DIRECTORYprefix,
the task body is sent via the /execute endpoint with an action body param set to "CREATE". (more on the API reference).
By default, adding the task doesn’t set it to STARTED state, so it won’t be picked up by the cron when it’s scheduled to run. a second API call is needed to activate the task.
here is a full cURL example:
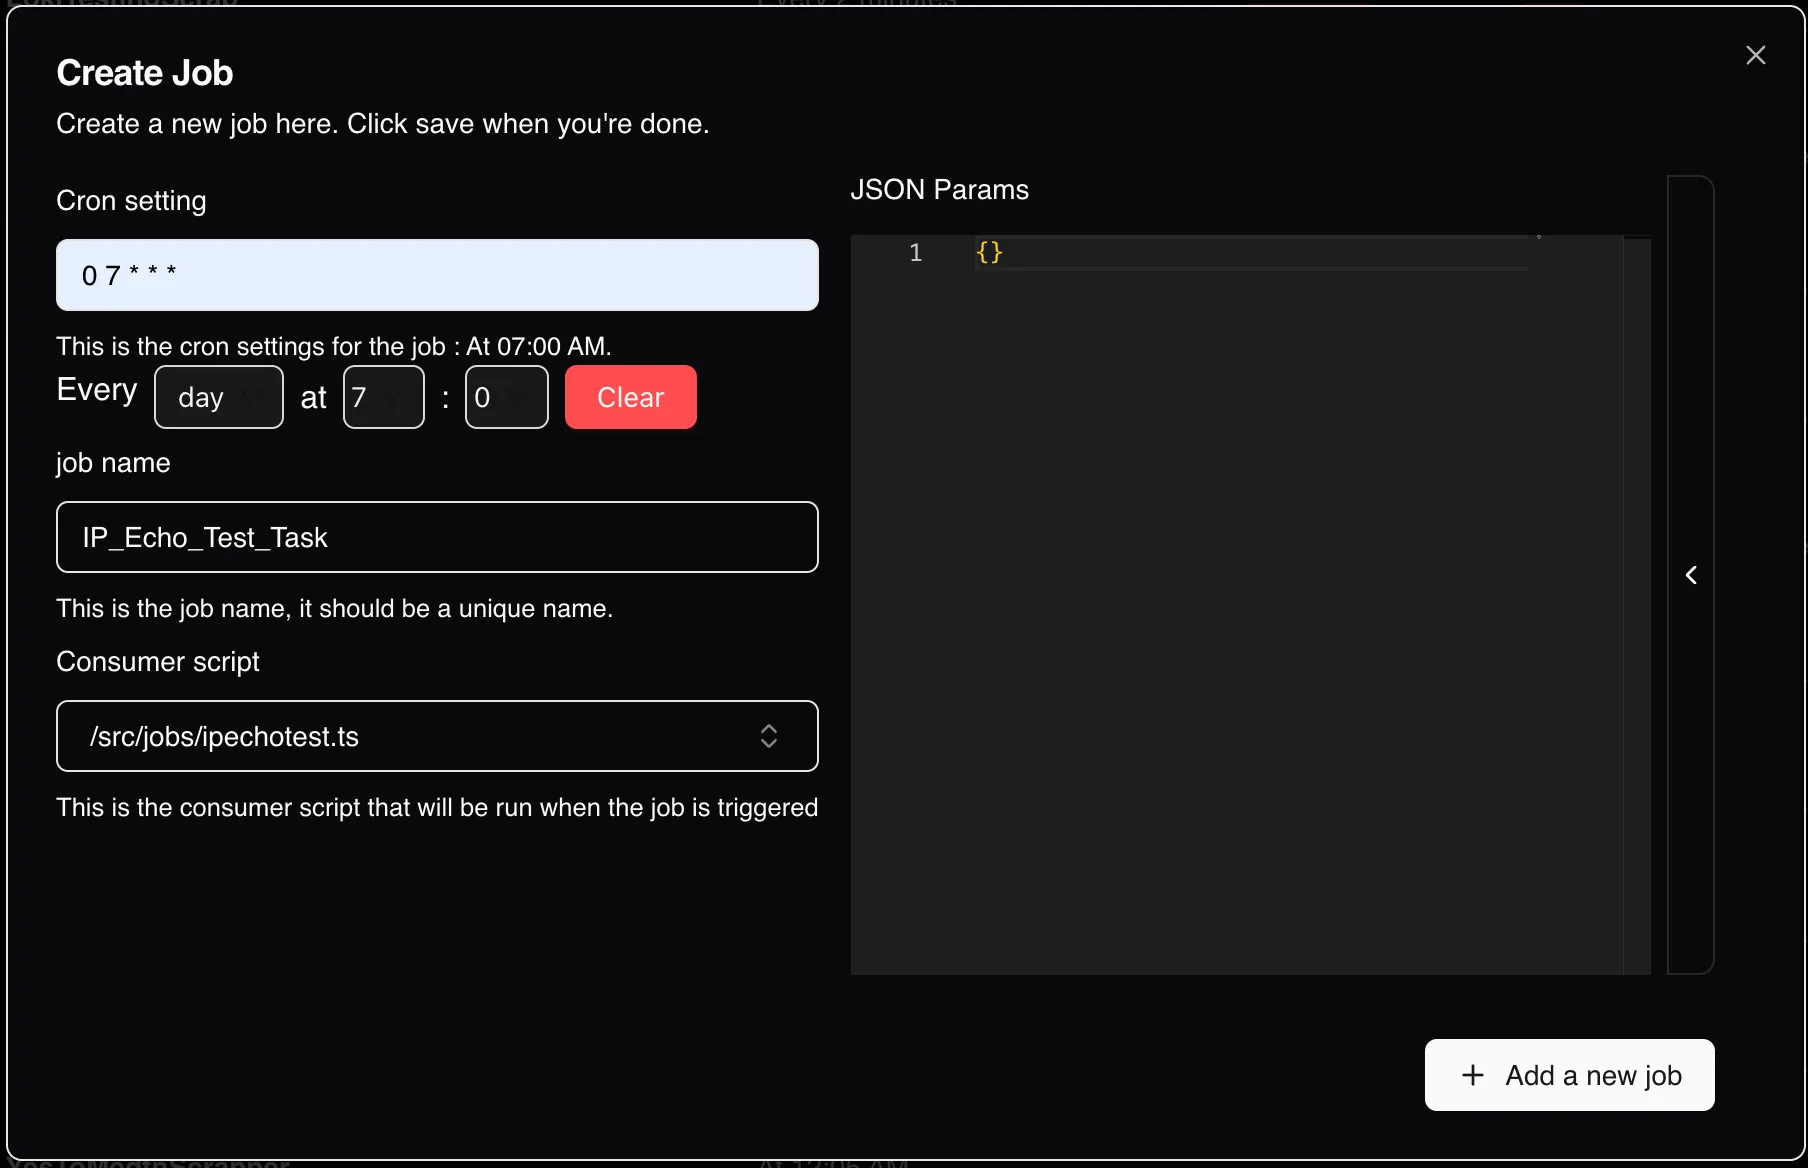
curl 'http://localhost:8080/jobs/executeAction' \ -H 'Accept: application/json, text/plain, */*' \ --data-raw '{"action":"CREATE","config":{"cronSetting":"0 7 * * *","name":"IP_Echo_Test_Task","consumer":"/src/jobs/ipechotest.ts","status":"STOPPED"}}'on the UI side a full example would look like this:
The immediate result on the UI side will be a new line added to the main tasks table
